Building Social Media Bots With Node-RED
I run several bots that post to social media and the number seems to keep growing. I've had a few people in the past ask me how I run them so I thought I'd finally get around to writing down how I manage it by leveraging Node-RED.
Intro to the bots
Before getting into the details, lets take a little look at what bots I actually run.
- Blog posts - Whenever I publish a new blog post I automatically create a new post on my personal Bluesky, Mastodon and LinkedIn profiles.
- CloudNative.Now - A monthly newsletter that I run that posts to Bluesky and Mastodon whenever a new issue is released.
- Conf.Party - Similar to above, this is a site I run to collect parties happening around conferences. It posts to Mastodon and Bluesky when new parties are added.
- Kubernetes Releases - I have a bot post to Mastodon and Bluesky whenever there is a new Kubernetes release available on GitHub.
- Mastodon Releases - I have a bot post to Mastodon whenever there is a new Mastodon release available on GitHub.
- Dropout.Tv Releases - A bot that posts to Mastodon and Bluesky whenever there is a new video on the Dropout.TV new releases page.
The bots each post a customised message template that remains the same for each post.
How this looks in Node-RED
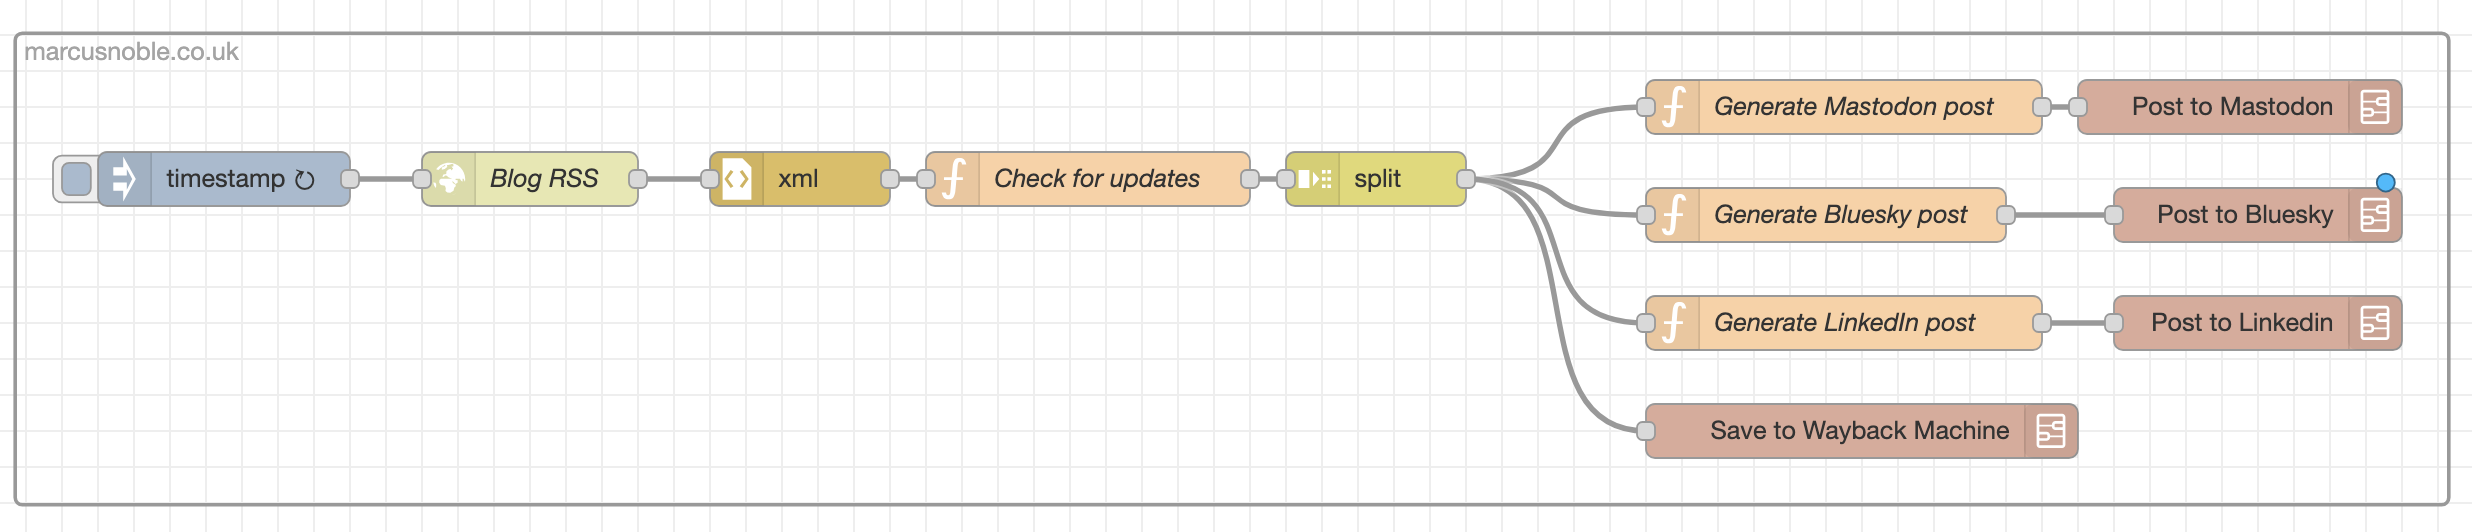
Almost all the bots follow roughly the same flow:
- They are triggered by a 15 minute interval inject node.
- An RSS feed with the source data is fetched (this is something like my blog RSS feed or the GitHub releases RSS feed).
- Parse the RSS feed XML.
- Iterate through each item in the feed and for each one check if the guid of that item already exists within a bot-specific context data store.
- If guid is not found in existing list include that item in the results then add the guid to the list and store into the context data store.
- Split the returned list of items into individual items.
- Build a message template for each social media platform.
- Send that message to a platform-specific subflow that handles the actual API call needed for each platform. (More on this below)

The exception to this is the Dropout TV bot. There isn't an RSS feed for the new releases so I had to do some web scraping instead and it took a bit of trial and error. I wont go into detail for this as it's very specific to this bot.

Lets take a look at each step in a bit more detail...
1. Inject Node
Nothing special here, it's an Inject Node with a repeat interval set to 15 minutes. Set this to whatever makes most sense to your bot but be sure to be respectful of the datasource you're fetching from and not to call too often.
2 & 3. Fetch RSS Feed
Again, nothing special here, just a HTTP request node that fetches the URL of the RSS feed and passes it on to an XML node to parse it to the JSON payload.
4. Check for updates
This is where we start to implement some logic. We use a Function Node with the following custom JavaScript:
// Grab our bots context data store or initialise it as an empty array
let prev = flow.get("kubernetes_releases") || [];
// Grab all the guids from our incoming RSS feed data
let guids = msg.payload.feed.entry.map(a => a.id[0])
// Create an array to store new posts in to return at the end
let newPosts = [];

// For each of the guids check if our existing context data contains it already
// If not, add the guid to the existing and add the whole post to the newPosts array
guids.forEach((guid, i) => {
    if (!prev.includes(guid)) {
        prev.push(guid)
        newPosts.push(msg.payload.feed.entry[i]);
    }
});

// Make sure we update our context data store with our updated list of entries
flow.set("kubernetes_releases", prev);

// Return all the new posts
return {
    payload: newPosts
};
5. Split
Use a Split Node to split the array returned from the previous function into single calls - Array split using fixed length of 1.
6. Generate Post Message
This will likely be different, more or less, for each bot as you'll want to build something that makes sense for the context of your bot.
The result of this function will also vary depending on the platform as different platforms require different values for authentication and similar. I'll cover these in more detail below when I look at each provider individually.
As an example, here's the function I use for the Mastodon release bot:
// Grab the title of the Release from the incoming RSS item.
// Depending on the feed structure this might be different.
let title = msg.payload.title[0];

// Handle some special cases where the release version contains "rc"
// as we want to make it clear that this is a Release Candidate release.
let variant = "";
if (title.includes('rc')) {
  variant = " Release Candidate";
}

// Build the post text
let postBody = `New Mastodon${variant} Release

:mastodon: ${title} :mastodon:

${msg.payload.link[0]['$'].href}

#Mastodon #Mastoadmin
`;

// Return the payload that will be passed into the Mastodon subflow
return {
  // The Mastodon instance the bot belongs to
  instance: "mastodon.social",
  // The dev access token for the bot
  password: "XXXXXXXXXXXXXXX",
  // The post text
  body: postBody
}
7. Post to Platform
This is different for each platform so we'll look at those individually below...
Posting to Mastodon

Posting an update to Mastodon is fairly simple. You'll first need to generate a new application access key (Settings -> Development -> New application) and make sure it has the write:status scope. Make a note of the access token as we'll be using this in our payload.
This subflow expects 3 properties on the input message:
instance- This is the Mastodon instance the bot belongs to and to which the API request will be made.password- This is the access token of our development applications.body- The actual text to post as the status update
With these 3 values we then first format the API payload in a function node using the following JavaScript:
return {
  payload: {
    status: msg.body,
    visibility: "public"
  },
  url: `https://${msg.instance}/api/v1/statuses`,
  headers: {
    "Authorization": "Bearer " + msg.password
  }
}
This is then passed to an http request node with the method set to POST which will perform the API call and then finally we output it to a debug node so we can check for any errors returned from the Mastodon API.
Posting to Bluesky

The Bluesky API is somewhat more complex to work with compared to Mastodon.
First off, we'll need to generate a new App Password to authenticate out bot (no need to direct message access).
We also need the Decentralized Identifier (DID) of our bot user. There's a couple ways to get the DID, you can either use the ATProto Browser website and enter the link to the user profile or you can make a CURL request to get the profile details, e.g.:
HANDLE='averagemarcus.bsky.social'
DID_URL="https://public.api.bsky.app/xrpc/app.bsky.actor.getProfile"
curl -G --silent --data-urlencode "actor=$HANDLE" "$DID_URL"
The DID will look something like did:plc:mtepw4cvbmdvu7zygmm5xbop.
This subflow expects 3 properties on the input message:
appPassword- The password we just generated for our bot.did- The DID of our bot.body- The actual text to post as the status update
Creating an API session
The first thing we need to do when working with the Bluesky API is to create a new session, using our DID and app password. In a function node we format these into the required payload:
msg.payload = {
  "identifier": msg.did,
  "password": msg.appPassword
};

return msg;
We then pass this to an http request node with the following values set:
- Method =
POST - URL =
https://bsky.social/xrpc/com.atproto.server.createSession - Headers =
Content-Type: application/json
And finally have this node output to a json node to parse the response into the payload for us to make use of in the next stage.
Building the post message
This is where things get really complicated. The ATProto isn't as user-friendly as the Mastodon API. You can't just pass it a block of text and it'll handle it and turn it into a nicely processed status post. Instead, you need to send you text along with all the details of the hashtags, links, media and mentions that are contained in your post.
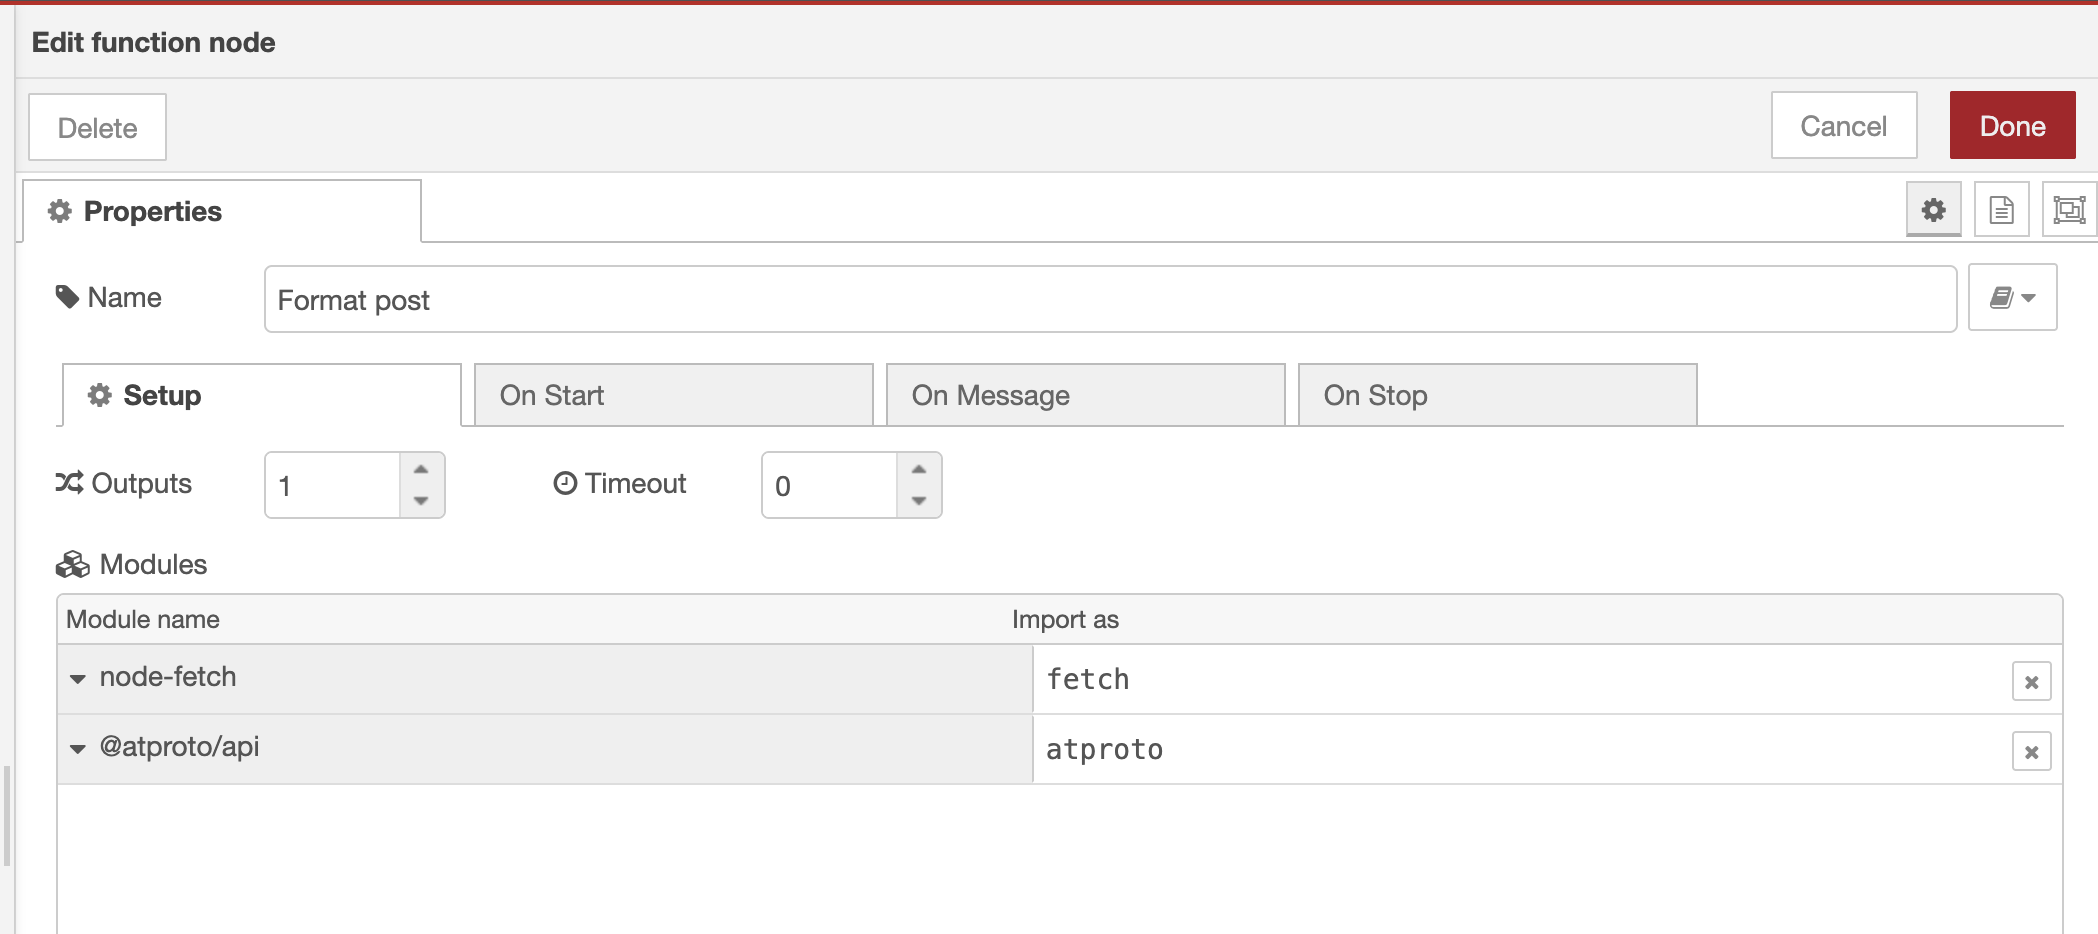
To be able to do this, we need a couple extra node modules to be made available to our Node-RED setup. In your Node-RED config directory make sure the following packages are also installed:
node-fetch@atproto/api
Now, in out Format post function node we need to reference these two packages in our "Setup" tab:
The function itself then looks something like this:
const getBlueskyAgent = async () => {
  const agent = new atproto.AtpAgent({
    service: "https://bsky.social",
  })

  await agent.login({
    identifier: msg.did,
    password: msg.appPassword,
  })

  return agent
}

const getUrlMetadata = async (url) => {
  const req = await fetch(`https://cardyb.bsky.app/v1/extract?url=${url}`)
  const metadata = await req.json()

  return metadata
}

const getBlueskyEmbedCard = async (url, agent) => {
  if (!url) return

  try {
    const metadata = await getUrlMetadata(url)
    const blob = await fetch(metadata.image.replaceAll('&', '%26')).then(r => r.blob())
    const { data } = await agent.uploadBlob(blob, { encoding: "image/jpeg" })

    return {
      $type: "app.bsky.embed.external",
      external: {
        uri: url,
        title: metadata.title,
        description: metadata.description,
        thumb: data.blob,
      },
    }
  } catch (error) {
    console.error("Error fetching embed card:", error)
    return
  }
}


const agent = await getBlueskyAgent()
const rt = new atproto.RichText({ text: msg.body })
await rt.detectFacets(agent)

let url = rt.facets.find(f => f.features && f.features.length && f.features[0].uri);
if (url) {
  url = url.features[0].uri
}

return {
  payload: {
    "collection": "app.bsky.feed.post",
    "repo": msg.did,
    "record": {
      "createdAt": (new Date),
      "$type": "app.bsky.feed.post",
      text: rt.text,
      facets: rt.facets,
      embed: await getBlueskyEmbedCard(url, agent),
    }
  },
  headers: {
    "Content-Type": "application/json",
    "Authorization": "Bearer " + msg.payload.accessJwt
  }
};
There's a lot going on here so I'm going to break it down...
First we have a function that generates a new Bluesky client for us to use to handle most of the actual work. We use our DID and app password as the login credentials to be able to perform any actions tat need authorisation.
const getBlueskyAgent = async () => {
  const agent = new atproto.AtpAgent({
    service: "https://bsky.social",
  })

  await agent.login({
    identifier: msg.did,
    password: msg.appPassword,
  })

  return agent
}
Next we have a couple helper functions to help with URL previews. First calls a service that generates metadata about an URL:
const getUrlMetadata = async (url) => {
  const req = await fetch(`https://cardyb.bsky.app/v1/extract?url=${url}`)
  const metadata = await req.json()

  return metadata
}
This returns something along the lines of the following:
{
  "error": "",
  "likely_type": "html",
  "url": "https://marcusnoble.co.uk/index.html",
  "title": "Blog",
  "description": "The blog of Marcus Noble, self-described tinkerer, platform engineer and all round average guy!",
  "image": "https://cardyb.bsky.app/v1/image?url=https%3A%2F%2Fopengraph.cluster.fun%2Fopengraph%2F%3FsiteTitle%3DMarcus%252BNoble%26title%3DBlog%26tags%3D%26image%3Dhttps%253A%252F%252Fmarcusnoble.co.uk%252Fimages%252Fmarcus.jpg%26bluesky%3D%2540averagemarcus.bsky.social%26fediverse%3D%2540marcus%2540k8s.social%26github%3DAverageMarcus%26website%3Dwww.MarcusNoble.co.uk%26bgColor%3D%2523ffffff%26fgColor%3D%2523263943"
}
This output is used in the next helper function to get our preview card details:
const getBlueskyEmbedCard = async (url, agent) => {
  if (!url) return

  try {
    const metadata = await getUrlMetadata(url)
    const blob = await fetch(metadata.image.replaceAll('&', '%26')).then(r => r.blob())
    const { data } = await agent.uploadBlob(blob, { encoding: "image/jpeg" })

    return {
      $type: "app.bsky.embed.external",
      external: {
        uri: url,
        title: metadata.title,
        description: metadata.description,
        thumb: data.blob,
      },
    }
  } catch (error) {
    console.error("Error fetching embed card:", error)
    return
  }
}
This builds an "embed" record for us to use with our post and will cause Bluesky clients to show a preview card of an URL contained in our post message.
With the helper functions defined we can start building our message. First off, we initialise a new client and parse our message body for any "facets". In the ATProto "facets" are things like hashtags, urls and mentions - the things that and up being links when rendered. We need to define these manually in our payload to the API so the @atproto/api module helps us generate these.
const agent = await getBlueskyAgent()
const rt = new atproto.RichText({ text: msg.body })
await rt.detectFacets(agent)
With the facets generated we then want to check if they contain any URLs and if so grab the first one found. We will use this to generate the preview card using our helper functions above.
let url = rt.facets.find(f => f.features && f.features.length && f.features[0].uri);
if (url) {
  url = url.features[0].uri
}
Finally we build our actual API payload. There's a few things going on here that I don't want to go into too much detail about but if you're interested then take a look at the Bluesky docs or the ATProto SDK docs.
return {
  payload: {
    "collection": "app.bsky.feed.post",
    "repo": msg.did,
    "record": {
      "createdAt": (new Date),
      "$type": "app.bsky.feed.post",
      text: rt.text,
      facets: rt.facets,
      embed: await getBlueskyEmbedCard(url, agent),
    }
  },
  headers: {
    "Content-Type": "application/json",
    "Authorization": "Bearer " + msg.payload.accessJwt
  }
};
The main thing to be aware of here is the "collection" of app.bsky.feed.post tells the API that this is a status post, the "repo" is our bot user and then the "record" contains our post text, the "facets" we generated with the @atproto/api module and an "embed" containing details of an URL preview card if an url was found in our message.
Finally, the Authorization header makes use of the accessjwt of the session we created in the previous stage.
With the message now, finally, build we can pass this on to an http request node that sends a POST request to https://bsky.social/xrpc/com.atproto.repo.createRecord and then finally sends the returned output to a debug node so we can check for errors.
Posting to LinkedIn

I actually wrote about this last week - Posting to LinkedIn via the API. The Node-RED implementation is just formatting the payload and then sending the HTTP request to the LinkedIn API.
let body = msg.body;
let urn = msg.urn;
let access_token = msg.access_token;

return {
  payload: {
    "author": "urn:li:person:"+urn,
    "lifecycleState": "PUBLISHED",
    "specificContent": {
      "com.linkedin.ugc.ShareContent": {
        "shareCommentary": {
          "text": body
        },
        "shareMediaCategory": "ARTICLE",
        "media": [
          {
            "status": "READY",
            "originalUrl": msg.link
          }
        ]
      }
    },
    "visibility": { "com.linkedin.ugc.MemberNetworkVisibility": "PUBLIC" }
  },
  url: `https://api.linkedin.com/v2/ugcPosts`,
  headers: {
    "Authorization": "Bearer " + access_token,
    "LinkedIn-Version": "202210",
    "X-Restli-Protocol-Version": "2.0.0"
  }
}
It's dead. The API isn't accessible anymore. Move on.
✨ Bonus ✨ - Archiving to Wayback Machine
As several of my bots are triggered from new posts being created on either this blog or new newsletter posts on CloudNative.Now I realised I could leverage the same flow to also ensure that the Wayback Machine on Archive.org grabs a copy of the new page to cache it.
The subflow to handle the Wayback Machine calls isn't too complex:
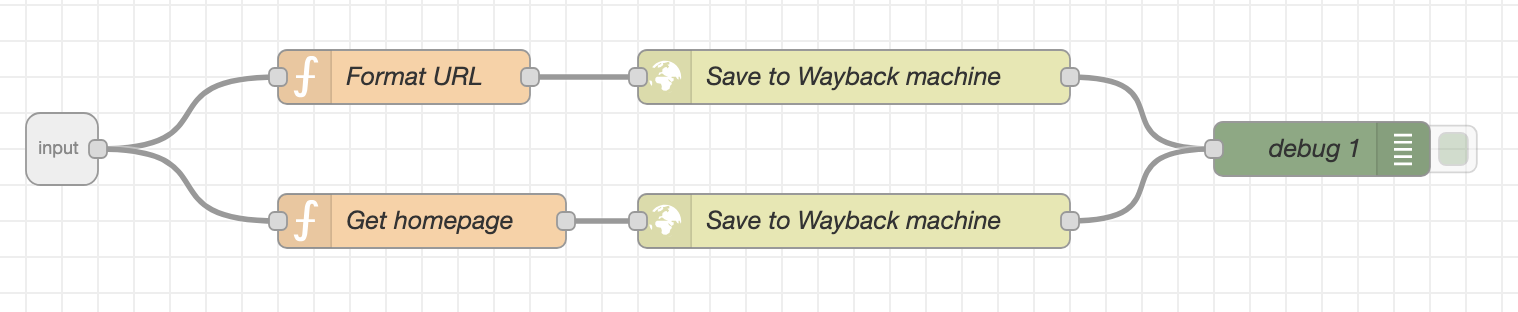
The subflow splits the incoming call into two flows - one that caches the new page and another that re-caches the homepage as this is also updated with the new post included.
Formatting the URL for the new page is very simple, we just take the URL of the page from the incoming message and prepend the Wayback Machine URL - https://web.archive.org/save/:
return {
    url: `https://web.archive.org/save/${msg.payload.link[0]}`
};
This then output to an http request node that calls the Wayback Machine save URL with out new page URL that triggers it to create a new cached copy for us.
The homepage flow is slightly more work, we just need to grab the homepage link from the new post URL:
let link = msg.payload.link[0].replace('https://', '').split('/')[0]

return {
    url: `https://web.archive.org/save/https://${link}`
};
And then again pass this on to the http request node to trigger the cache process.
Wrap Up
Hopefully this is helpful to some of y'all. Even if you don't end up using Node-RED for your bots there should be enough info here on how to make use of the different APIs to help you along.
I'd love to hear about what bots y'all are making - let me know on Bluesky or Mastodon!